


Welcome! I’m Sarah, and I’m so happy you’re here. If you’ve ever dreamed of biting into something that shatters crisp on the outside but reveals a ridiculously chewy, cheesy interior, then you absolutely have to try this Brazilian cheese bread. We’re diving deep into the magic of Pão de Queijo today—the real, authentic deal!

When I share recipes on Cut Cook Taste, I promise you reliability. My background isn’t in some fancy culinary school; it’s built on years of testing recipes in my own busy kitchen, trying to bring the comforting flavors of my childhood to yours, while keeping things practical. You can read more about my journey in my About Me section! That’s why I’m thrilled to bring you this version, because it happens to be naturally gluten-free! You don’t need wheat for delicious, pull-apart rolls. Trust me, once you master this technique, these Gluten Free Cheese Bread bites will become your go-to party snack.
We’re focusing on that incredible texture that defines perfect Pão de Queijo. Forget dense hockey pucks; we want golden puffs that stretch when you tear them apart. Let’s get those ovens preheated!
- Why You Will Love This Authentic Brazilian Cheese Bread
- Essential Ingredients for Perfect Brazilian Cheese Bread
- How to Make Brazilian Cheese Bread: Step-by-Step Instructions
- Making Brazilian Cheese Bread Ahead of Time
- Serving Suggestions for Your Brazilian Cheese Bread
- Storage and Reheating Instructions for Brazilian Cheese Bread
- Frequently Asked Questions About Pao de Queijo Recipe
- Nutritional Estimates for Homemade Brazilian Cheese Bread
- Share Your Brazilian Snack Recipe Success
Why You Will Love This Authentic Brazilian Cheese Bread
Honestly, this recipe is a rockstar. I have so many go-to recipes, but when I need something fast that always wows people, these little puffs are the ones I turn to. They just hit all the right spots, every single time, without fail.
Here’s the quick rundown on why this Authentic Brazilian Cheese Bread ends up being the first thing to disappear at any gathering:
- Naturally Gluten Free: Because we rely entirely on tapioca flour, these are perfect for anyone avoiding gluten. No weird substitutions needed here—it’s the real deal!
- That Perfect Texture Combo: You get that snap of a crispy exterior shell that immediately gives way to a soft, famously chewy, and supremely cheesy center. It’s unbelievably satisfying.
- Super Quick Prep: Seriously, you mix the wet ingredients, dump in the starch, stir, and throw in the cheese. Total hands-on time is under 15 minutes. You can’t beat that speed for something this impressive.
- Total Versatility: Whether you need a warm snack with your morning coffee, a fantastic appetizer for game night, or a truly unique side dish for dinner, these little savory Brazilian bites fit the bill perfectly.
Essential Ingredients for Perfect Brazilian Cheese Bread
The secret to getting that incredible stretch and airy crunch comes down to just a handful of simple ingredients. You don’t need a pantry full of specialty items, but the few things we *do* use have to be right. I always keep a giant bag of tapioca flour on hand because once you realize how versatile this stuff is, you’ll use it constantly in your appetizer rotation!
When you look at the full list, you see butter, milk, eggs, salt—the usual suspects. But pay close attention to the starch. That’s what makes this recipe fundamentally different from any other bread you’ve tried.
Ingredient Notes and Substitutions for Brazilian Cheese Bread
Let’s talk about the star: tapioca flour, sometimes called tapioca starch. This is non-negotiable! This flour is derived from the cassava root, which is why these puffs are naturally gluten free. If you try to substitute wheat flour here, you won’t get that signature chewy, gelatinous texture we are chasing. It just won’t happen, so please stick to the tapioca flour bread for the best results.
Next up, the cheese. My go-to is mostly Parmesan because it has such a distinct salty bite. But if you are aiming for that super-famous restaurant style that everyone talks about, try my mix! Use about 3/4 cup of good Parmesan and then add 1/4 cup of a mild, melty cheese like freshly shredded Mozzarella or Monterey Jack. That combination gives you flavor *and* that perfect pull, much like those amazing Texas de Brazil Copycat rolls!
How to Make Brazilian Cheese Bread: Step-by-Step Instructions
This is where the magic happens, and honestly, it feels a little bit like a science experiment at first, but stick with me! While some incredibly fast recipes claim to use a blender, I always stick to this stovetop method because it ensures we get that beautiful, scalded tapioca starch, which is the foundation for incredible texture. Don’t worry about your first batch looking weird; mine certainly didn’t look like the polished versions online right away!
First things first, get organized! Preheat your oven to 375°F (190°C). I like to use a standard 12-cup muffin tin for my first batch because it helps them bake evenly and keeps them in a nice round shape, but you can totally use a baking sheet lined with parchment for more rustic, homemade Brazilian rolls if you prefer.
Step one is heating up the liquids. In a saucepan, combine your whole milk, oil, and salt. Bring this mixture right up to a rolling boil over medium heat. You want it hot—boiling hot! Once it hits that boil, you need to act fast. Take it off the heat source instantly.
Now, for the crucial part that feels a little wrong: Dump in all 2 cups of your tapioca flour *all at once*. Trust me on this one! You need to stir it vigorously with a good sturdy wooden spoon. I mean really stir hard! It’s going to look messy and sticky and a little lumpy for a second, like a thick paste. That’s exactly what you want! This “scalding” locks in the moisture and sets up the gluten-free structure that gives us that famous irresistible stretch. I remember the first time I made these, I thought I had ruined the whole batch because the dough was so stiff and sticky, but sticking to the recipe for the cooling time saved the day!
You *must* let this dough cool down before adding the eggs. If you add them while it’s too hot, you’ll end up with cheesy scrambled eggs—and nobody wants that! Give the dough about 10 minutes until it’s just warm to the touch. Then, add your eggs one at a time, mixing well after each one. The dough might look loose or slightly separated at this stage, but keep mixing; it will come back together.
Finally, fold in all that gorgeous shredded cheese until it’s beautifully distributed. Scoop this batter into your prepared cups or roll them into little balls, filling the cups about two-thirds full. Pop them in the oven and bake for 20 to 25 minutes until they are beautifully golden brown. They should be puffed up and look ready to eat! Serve them warm for the ultimate experience.
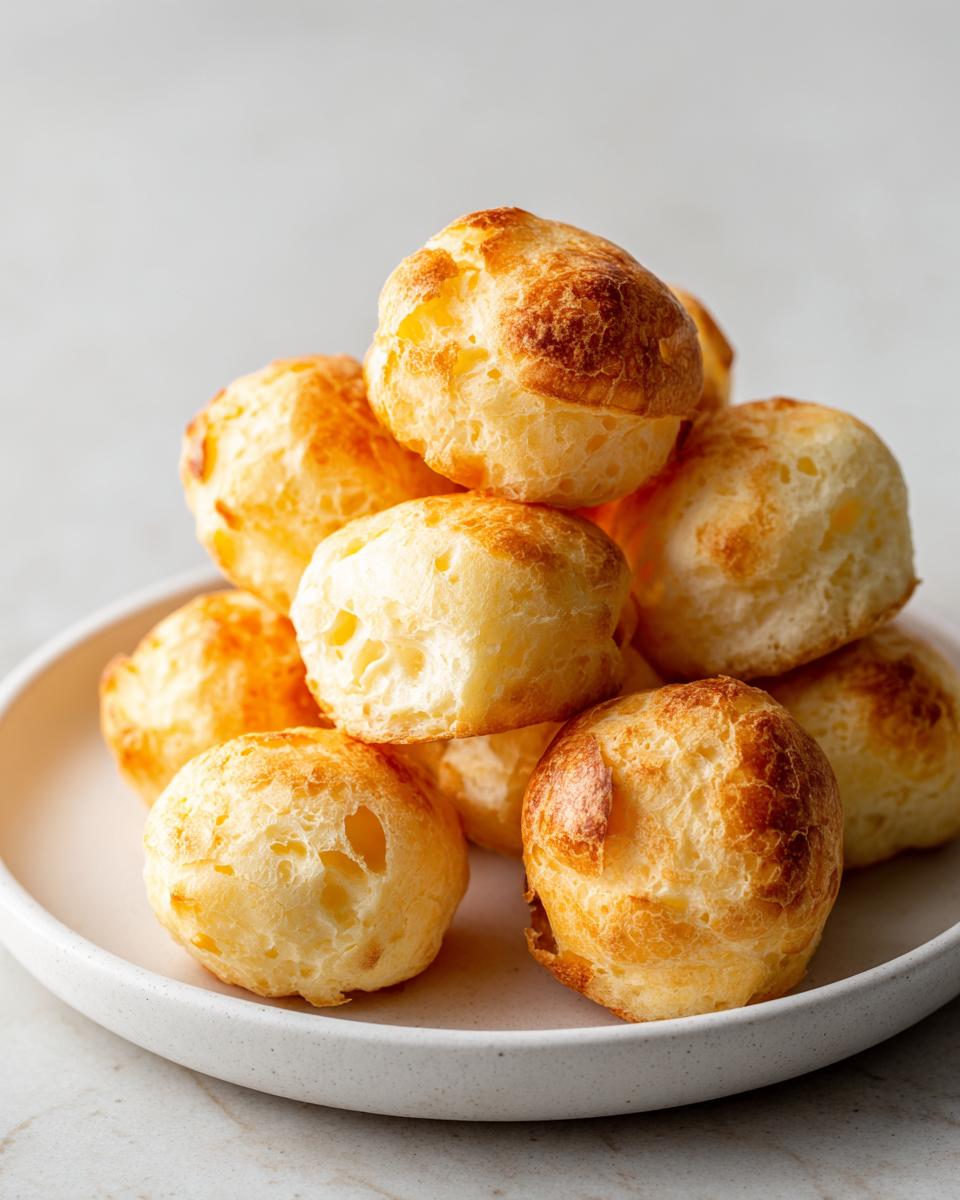
Tips for Achieving Crispy Chewy Cheese Puffs
Getting that perfect textural contrast—crispy shell, chewy inside—is all about consistency in the oven. Don’t mess around with that temperature! If you drop it too low, they dry out instead of puffing. Keep that oven steady at 375°F.
Also, for the best rise, don’t overfill your muffin tin cups or parchment-lined sheet. Remember, these are going to puff up! If they are too crowded, they steam each other instead of crisping on the outside. Give them some space to breathe and develop that wonderful crust. This attention to space separates a good batch of homemade Brazilian rolls from a great batch.
And just a quick reminder on the eggs: make sure that dough is only warm, not hot, before adding them. This prevents scrambling and ensures you get that seamless, elastic dough structure needed for the best Chewy Cheese Puffs.
Making Brazilian Cheese Bread Ahead of Time
If you’re making these for a party or just planning ahead for busy mornings, I have great news! This recipe is fantastic for making ahead because the dough freezes beautifully. This is my secret weapon when I know I have zero time in the morning.
Once you’ve mixed the dough and incorporated the cheese (Step 6 in the main instructions), scoop the dough into balls about 1.5 inches wide. Place these dough balls on a baking sheet lined with parchment paper, making sure they aren’t touching. Pop the whole sheet into the freezer. Once they are frozen solid, usually after an hour or two, you can transfer all those frozen balls into a zip-top freezer bag. They’ll keep perfectly for up to three months!
The best part? You don’t even need to thaw them out before baking. Just preheat your oven, place the frozen rolls directly onto a lined baking sheet, and add about 5 to 10 minutes to the regular baking time. They might look a little less puffed at first, but they will catch up as they bake. It’s such a lifesaver when you need a quick quick gluten free bread fix without any prep!
Serving Suggestions for Your Brazilian Cheese Bread
Part of the joy of Pão de Queijo is how versatile they are. In Brazil, you’ll often find these served piping hot first thing in the morning alongside a strong cup of coffee—it’s just heavenly! They make the ideal breakfast bread.
But if you’re serving them as an appetizer, they are perfect on their own, of course. However, if you want to elevate them just a touch, these Savory Brazilian Bites pair beautifully with a creamy dip. They are sturdy enough to scoop up everything from spicy jalapeño jelly to a classic warmed spinach and artichoke dip.

They are also absolutely wonderful served alongside a bowl of hearty soup or stew, soaking up all those extra savory flavors. They’re a stellar replacement for standard dinner rolls!
Storage and Reheating Instructions for Brazilian Cheese Bread
If you manage to have any leftovers (which I rarely do, to be honest!), storing them is simple. Keep any cooled rolls in an airtight container at room temperature for up to two days. They’ll lose a little bit of their crispness, but they stay wonderfully chewy inside.
Now, do *not* try to reheat these in the microwave! The microwave is the enemy of crispness here; it just makes them rubbery. To bring them back to their former glory, you need to reheat them using dry heat. Pop them in a toaster oven or a regular oven set to about 350°F for about 5 minutes. You want them hot all the way through, with that satisfying little crust reforming on the outside. This works great for bringing back that fresh-from-the-oven texture.
Frequently Asked Questions About Pao de Queijo Recipe
Is this truly gluten free?
Yes, absolutely! This recipe relies solely on tapioca flour (also called tapioca starch), which is naturally gluten free because it comes from the cassava root. There is no wheat flour used whatsoever, making this a fantastic, authentic option for those avoiding gluten.
Can I use regular all-purpose flour instead of tapioca flour?
Oh, I wouldn’t recommend it if you want the real thing! If you swap in regular flour, you will miss the signature texture. Regular flour creates a standard bread crumb, but the tapioca starch creates that stretchy, wonderfully chewy, somewhat elastic interior that is unique to proper Pão de Queijo. Stick to the starch for that perfect result!
Why are my cheese bread balls flat and not puffy?
Usually, flat puffs mean one of two things. First, check your oven temperature with a separate thermometer—if it’s running cool, they won’t rise properly. Second, and most often, it happens if you added the eggs when the flour and liquid mixture was still too hot, causing the eggs to basically cook instantly instead of helping the bread rise in the oven. Be patient during that cooling stage!
What is the best cheese blend for authentic flavor?
While Parmesan gives you that necessary sharp, salty flavor, many people find that mixing it with a milder, gooier cheese helps achieve the classic pull. I usually use 75% Parmesan and 25% Mozzarella for a perfect balance of flavor and texture. If you are interested in trying different flavor profiles, check out some more recipe tests I’ve done!
Troubleshooting Common Brazilian Cheese Bread Issues
If your main issue is that the puffs are chewy but lack that light, hollow interior, the issue is likely in the boiling stage. You need to make sure that milk/oil mixture is vigorously boiling before you dump in the tapioca starch. That initial blast of heat helps gelatinize the starch just enough to create steam pressure in the oven, which puffs them up into those perfect little spheres. If you only warm the liquid slightly, you won’t get the expansion you’re looking for.
Nutritional Estimates for Homemade Brazilian Cheese Bread
I always want to be upfront about the nutrition, because these little bites are quite cheesy and fatty, they taste incredible! Based on the recipe using the ingredients listed, here is an estimate for one roll.
Please remember these are just estimates! The exact values can change depending on the brand of cheese and oil you use. For instance, using leaner cheese will drop the fat content a little bit, but honestly, what’s the fun in that?
- Serving Size: 1 roll
- Calories: 140
- Fat: 8g
- Saturated Fat: 4g
- Carbohydrates: 14g
- Protein: 5g
- Sugar: 0.5g
Share Your Brazilian Snack Recipe Success
I truly hope you loved making these as much as I did sharing them with you. This brazilian cheese bread recipe is one that I always come back to when I need a reliable, delicious, naturally gluten free treat. Please let me know what you thought!
If you bake a batch, I would absolutely love to see them! Tag me on social media or drop a comment below and let me know if you used my Parmesan/Mozzarella blend or if you tried something else. Your feedback means the world to me as I continue building this kitchen community. If this recipe made your day, please rate it 5 stars!
Thank you again for stopping by Cut Cook Taste. If you want to see what else I’m cooking up this week, feel free to check out my contact page for updates! Happy baking, friends!
Making Brazilian Cheese Bread Ahead of Time
If you have any kind of busy schedule, prepping ahead is your best friend, and luckily, these little puffs are absolute champions for making ahead! I always have a bag of frozen *Pão de Queijo* dough balls tucked away in my freezer for those days when I need a quick snack but don’t have 30 minutes to mix and bake. They freeze like a dream, which means instant homemade Brazilian rolls are always possible!
The key here is to freeze them *before* baking. Once you’ve mixed up that glorious dough and incorporated the cheese (that’s the end of Step 6 in our main instructions), scoop your batter into those 1.5-inch balls. Place them on a baking sheet lined with parchment paper—and this is important—make sure they aren’t touching each other. We want them to freeze individually so they don’t fuse into one giant cheesy blob!
Pop that entire sheet pan into the freezer. Let them sit for about an hour or two until they are rock hard. Once they are totally frozen, you can just transfer all those solid little orbs right into a heavy-duty zip-top freezer bag. They’ll stay perfect for up to three months. Pulling them out for a party is so easy!
Now, for baking from frozen—this is the simple trick you need to know for a quick gluten free bread fix. Preheat that oven exactly as recommended. You don’t need to defrost them at all! Just place the frozen dough balls onto your lined baking sheet and bake them straight from the freezer. Because they start cold, you’ll just need to add an extra 5 to 10 minutes to the usual baking time. They might look a little pale halfway through, but keep watching them; they’ll puff right up and turn golden brown, just like the fresh batches!
Serving Suggestions for Your Brazilian Cheese Bread
Part of the joy of Pão de Queijo is how versatile they are. In Brazil, you’ll often find these served piping hot first thing in the morning alongside a strong cup of coffee—it’s just heavenly! They make the ideal breakfast bread.
But if you’re serving them as an appetizer, they are perfect on their own, of course. However, if you want to elevate them just a touch, these Savory Brazilian Bites pair beautifully with a creamy dip. They are sturdy enough to scoop up everything from spicy jalapeño jelly to a classic warmed spinach and artichoke dip.
They are also absolutely wonderful served alongside a bowl of hearty soup or stew, soaking up all those extra savory flavors. They’re a stellar replacement for standard dinner rolls!
Storage and Reheating Instructions for Brazilian Cheese Bread
If you manage to have any leftovers (which I rarely do, to be honest!), storing them is simple. Keep any cooled rolls in an airtight container at room temperature for up to two days. They’ll lose a little bit of their crispness, but they stay wonderfully chewy inside. Seriously, that interior chewiness lasts for ages!
Now, do *not* try to reheat these in the microwave! I learned this the hard way early on; the microwave is the enemy of crispness here because it just blasts the moisture back into the crust, making them rubbery and sad. We worked too hard for those perfect crispy cheesy bites to let the microwave ruin them!
To bring them back to their former glory, you need to reheat them using dry heat. Pop them in a toaster oven or a regular oven set to about 350°F for about 5 minutes. If you have an air fryer—and oh my gosh, if you do, use it!—pop them in there at 325°F for maybe three minutes. You want them hot all the way through, with that satisfying little crust reforming on the outside. This works great for bringing back that fresh-from-the-oven texture we love so much.
Frequently Asked Questions About Pao de Queijo Recipe
I know that even with the best instructions, sometimes a little question pops up when you’re knee-deep in tapioca starch! That’s totally normal. When I first started exploring authentic Brazilian food, I had a million questions, especially about this Gluten Free Cheese Bread. Here are the ones I get asked the most about this Pao de Queijo Recipe.
Is this truly gluten free?
Yes, absolutely! This recipe relies solely on tapioca flour (also called tapioca starch), which is naturally gluten free because it comes from the cassava root. There is no wheat flour used whatsoever, making this a fantastic, authentic option for anyone looking for naturally gluten free baking.
Can I use regular all-purpose flour instead of tapioca flour?
Oh, I wouldn’t recommend it if you want the real thing! If you swap in regular flour, you will miss the signature texture. Regular flour creates a standard bread crumb, but the tapioca starch creates that stretchy, wonderfully chewy, somewhat elastic interior that is unique to proper Pão de Queijo. Stick to the starch for that perfect result, trust me!
Why are my cheese bread balls flat and not puffy?
Usually, flat puffs mean one of two things. First, check your oven temperature with a separate thermometer—if it’s running cool, they won’t rise right. Second, and most often, it happens if you added the eggs when the flour and liquid mixture was still too hot, causing the eggs to basically cook instantly instead of helping the bread rise in the oven. Be patient during that cooling stage!
What is the best cheese blend for authentic flavor?
While Parmesan gives you that necessary sharp, salty flavor, many people find that mixing it with a milder, gooier cheese helps achieve the classic pull. I usually use 75% Parmesan and 25% Mozzarella for a perfect balance of flavor and texture. If you’re aiming close to restaurant style, try adding a small amount of mild white cheese to get those incredible party cheese bread vibes without losing the Parmesan kick.
Troubleshooting Common Brazilian Cheese Bread Issues
If your main issue is that the puffs are chewy but lack that light, hollow interior, the issue is likely in the boiling stage. You need to make sure that milk/oil mixture is vigorously boiling before you dump in the tapioca starch. That initial blast of heat helps gelatinize the starch just enough to create steam pressure in the oven, which puffs them up into those perfect little spheres. If you only warm the liquid slightly, you won’t get the expansion you’re looking for. That initial liquid scalding is the absolute key to achieving that signature stretch in your Chewy Cheese Puffs.
Nutritional Estimates for Homemade Brazilian Cheese Bread
I always want to be upfront about the nutrition, because these little bites are quite cheesy and fatty, they taste incredible! Based on the recipe using the ingredients listed, here is an estimate for one roll.
Please remember these are just estimates! The exact values can change depending on the brand of cheese and oil you use. For instance, using leaner cheese will drop the fat content a little bit, but honestly, what’s the fun in that? When you skip the wheat and rely on starch, the profile changes, and it’s good to know what you’re eating!
- Serving Size: 1 roll
- Calories: 140
- Fat: 8g
- Saturated Fat: 4g
- Carbohydrates: 14g
- Protein: 5g
- Sugar: 0.5g
Share Your Brazilian Snack Recipe Success
I truly hope you loved making these as much as I did sharing them with you. This brazilian cheese bread recipe is one that I always come back to when I need a reliable, delicious, naturally gluten free treat. Please let me know what you thought!
If you bake a batch, I would absolutely love to see them! Tag me on social media or drop a comment below and let me know if you used my Parmesan/Mozzarella blend or if you tried something else. Your feedback means the world to me as I continue building this kitchen community. If this recipe made your day, please rate it 5 stars!

Thank you again for stopping by Cut Cook Taste. If you want to see what else I’m cooking up this week, feel free to check out my contact page for updates! Happy baking, friends!
PrintAuthentic Pão de Queijo (Brazilian Cheese Bread): Crispy, Chewy, and Naturally Gluten-Free

Welcome! I’m Sarah, and I’m so happy you’re here. Make this authentic Pão de Queijo, the famous Brazilian Cheese Bread, that is naturally gluten-free. These bites are crispy on the outside and wonderfully chewy and cheesy on the inside. This recipe is easy to follow and perfect for breakfast, snacks, or party appetizers.
- Prep Time: 15 min
- Cook Time: 25 min
- Total Time: 40 min
- Yield: 12 servings 1x
- Category: Appetizer
- Method: Baking
- Cuisine: Brazilian
- Diet: Gluten Free
Ingredients
- 1 cup whole milk
- 1/2 cup vegetable oil
- 1 teaspoon salt
- 2 cups tapioca flour (tapioca starch)
- 2 large eggs
- 1 cup shredded Parmesan cheese (or a mix of Parmesan and Mozzarella)
Instructions
- Preheat your oven to 375°F (190°C). Lightly grease a standard 12-cup muffin tin or line a baking sheet with parchment paper.
- Combine the milk, oil, and salt in a medium saucepan. Bring this mixture to a boil over medium heat.
- Remove the saucepan from the heat immediately. Add the tapioca flour all at once and stir vigorously with a wooden spoon until a thick, sticky dough forms. This step is important for the chewy texture.
- Let the dough cool for about 10 minutes until it is warm, not hot.
- Add the eggs one at a time, mixing well after each addition until fully incorporated. The dough will look loose at first, but keep mixing.
- Stir in the shredded cheese until it is evenly distributed throughout the dough.
- Scoop the dough into the prepared muffin cups, filling each about two-thirds full, or roll into small balls (about 1.5 inches in diameter) and place them on the baking sheet.
- Bake for 20 to 25 minutes, or until the cheese puffs are golden brown and slightly puffed.
- Remove from the oven and let them cool slightly before serving. Enjoy these irresistible cheesy bites warm!
Notes
- For the best texture, use high-quality, finely grated Parmesan cheese.
- If you want a copycat version similar to Texas de Brazil Cheese Bread, use a blend of 3/4 cup Parmesan and 1/4 cup mild white cheese like Monterey Jack.
- This recipe is naturally gluten free, making it a great option for gluten free baking.
Nutrition
- Serving Size: 1 roll
- Calories: 140
- Sugar: 0.5
- Sodium: 180
- Fat: 8
- Saturated Fat: 4
- Unsaturated Fat: 4
- Trans Fat: 0
- Carbohydrates: 14
- Fiber: 0.2
- Protein: 5
- Cholesterol: 35