


Oh, you know that feeling, right? You’re sitting down to your favorite pasta dish, and all you can think about is that basket of warm, impossibly soft breadsticks steaming up the side of the table at your favorite Italian spot. I spent way too many years ordering extra sides just to get that garlic-buttery goodness!
Well, stop wishing and start baking! I’ve put this copycat recipe through the ringer right here in my kitchen to ensure it delivers on texture and flavor. I promise you, these Ultimate Soft & Chewy Olive Garden Copycat Breadsticks with that incredible Garlic Parmesan Butter are easier to conquer at home than you think. My promise to you, just like with all my family-friendly meals, is that this method is totally reliable!
- Why You Will Love These Soft Breadsticks
- Ingredients for the Ultimate Homemade Breadsticks Recipe
- How to Make Restaurant Style Breadsticks: Step-by-Step Instructions
- Variations: Making Cheesy Breadsticks or Mozzarella Breadsticks
- Tips for Success with Your Breadsticks Dough Recipe
- Storage and Make Ahead Breadsticks Instructions
- Serving Suggestions for Dinner Side Dish Bread
- Frequently Asked Questions About These Breadsticks
- Estimated Nutritional Values for These Breadsticks
- Serving Suggestions for Dinner Side Dish Bread
- Share Your Homemade Breadsticks Experience
- Estimated Nutritional Values for These Breadsticks
- Share Your Homemade Breadsticks Experience
Why You Will Love These Soft Breadsticks
- They nail that restaurant style breadstick texture—super soft and delightfully chewy inside, never dry!
- The Garlic Butter Topping is pure magic; we are loading these bad boys up with real garlic and Parmesan cheese.
- This is honestly an Easy Breadsticks recipe; the dough comes together fast and lets you hang out while it rises.
- Perfect quick bread recipe for a weeknight side dish, ready in just over an hour total.
- They freeze beautifully, making them the ultimate make ahead breadsticks for surprise guests!
- We’re using a simple homemade dough recipe, so you control exactly what goes into your appetizer bread sticks.
Seriously, once you smell that butter hitting the hot breadsticks, you’ll know you made the right choice skipping those frozen bags. Trust me on this one!

Ingredients for the Ultimate Homemade Breadsticks Recipe
Gathering your ingredients is the first crucial step to breadstick success! Don’t be tempted to swap things out here; the balance between the soft dough and that rich topping is key to getting that spot-on restaurant flavor. I always lay everything out first, kind of like preparing for a big event. If you want to see how I handle other doughs, check out my tips for making crusty Italian bread!
For the Homemade Dough Recipe
- 1 1/2 cups warm water (and I mean warm! Aim right between 105-115°F, or the yeast won’t wake up properly.)
- 2 1/4 teaspoons active dry yeast (the instant kind works too, but this is what I test with!)
- 2 tablespoons granulated sugar (this is just yeast food, don’t panic about sweetness!)
- 4 cups all-purpose flour, plus more for dusting when we knead later
- 1 teaspoon salt
- 1/4 cup vegetable oil, plus a bit more for greasing the bowl
For the Garlic Parmesan Breadsticks Topping
This simple blend is what transforms basic bread into those famous, buttery breadsticks. It’s what you’ll be brushing on right when they come out of the oven!
- 1/2 cup (or one regular stick) unsalted butter, melted until smooth
- 4 cloves garlic, minced as finely as you can manage
- 1 teaspoon dried Italian seasoning (this adds that beautiful, herbaceous aroma)
- 1/2 cup freshly grated Parmesan cheese (make sure it’s grated—shredded melts weird!)
How to Make Restaurant Style Breadsticks: Step-by-Step Instructions
Okay, this is the fun part! Making dough from scratch can feel intimidating, but I promise these steps walk you right through to chewy, irresistible breadsticks. Think of it like following a map to buried treasure—the treasure being a warm basket on your table! For a slightly different, but still easy approach, you can check out my thoughts on using premade dough, though I really love this homemade dough recipe.
Activating Yeast and Mixing the Breadsticks Dough
We start with the yeast because it’s the heart of that fluffy texture. Remember that rule: the water needs to be warm, not hot—like a nice warm bath, around 105°F to 115°F. Mix your warm water, yeast, and sugar in a big bowl. You have to let this sit undisturbed for 5 to 10 minutes. Be patient! When you see that layer of foam bubbling up on top? That’s your green light. It means the yeast is alive and ready to work its magic on these soft breadsticks.
Once it’s foamy, toss in most of your flour (save about a half cup just in case!), the salt, and the vegetable oil. Mix it all together with a sturdy spoon until it just comes together into a messy, shaggy blob. Don’t overmix it yet; we’re just getting things acquainted before the real work begins.
Kneading and Achieving the Perfect Chewy Breadsticks Texture
Time to get those hands dusty! Turn that dough out onto a lightly floured surface. Now, we knead. You want to work this dough for a solid 5 to 7 minutes. It takes a little elbow grease, but this is where we build the character of the breadsticks. I always watch for the dough to switch from feeling sticky and clumpy to becoming smooth and elastic. It should be soft to the touch, but it shouldn’t stick horribly to your fingers.
If your dough seems really wet, add the remaining flour just a tablespoon at a time. I learned early on that adding too much flour guarantees dry breadsticks, and we are aiming for soft texture here! Remember, the goal is a soft, lovely ball of dough.
Rising and Shaping Your Homemade Breadsticks
Once it’s smooth, grab a clean bowl, put a little oil in the bottom, and place your dough ball in there, turning it over so it gets a light coating. Cover it up tight—I usually stick mine in the oven that I just turned OFF, which creates a perfect little warm ecosystem. Let that dough hang out for a full hour, or until it has doubled in size. Don’t peek too often!
When it’s doubled, give it a firm punch down—it’s very satisfying! Divide the dough into 12 equal pieces. Don’t worry about being perfect; these are homemade! Roll each piece out gently into a long stick, aiming for about 10 to 12 inches long. Lay them on your parchment-lined sheet. See? So simple. You can find more tips on quick baking techniques over on this site!

Baking and Applying the Garlic Butter Topping
While the dough rests for its quick 15-minute second rise, make sure your oven is roaring at 400°F (200°C). That heat is essential for a nice puff! This is the moment of truth:
- Bake those sticks for just 10 to 12 minutes. Watch them closely—we want light golden brown, not dark brown!
- While they are baking, quickly mix up the melted butter, minced garlic, and Italian seasoning.
- The second they come out of the oven, while they are still sizzling hot, brush that glorious garlic butter mix all over every stick. You need to do this right away so the bread soaks it up.
- Finally, hit them hard with that grated Parmesan cheese! Serve immediately while those buttery flavors are still melting in. This entire process is so much easier than trying to figure out complicated dinner recipes! If you struggled with yeast before, I posted some extra tips on that process here.
Variations: Making Cheesy Breadsticks or Mozzarella Breadsticks
Okay, listen up, because if the classic garlic butter isn’t enough for you—and honestly, sometimes it isn’t—we absolutely have to talk about adding cheese. Cheese makes everything better, right? This recipe is screaming out for a little extra indulgence, and thankfully, turning these into Cheesy Breadsticks or even Mozzarella Breadsticks is super easy!
If you are already making the garlic butter topping, it only takes two extra minutes to load them up. I swear, the smell of baking bread mixed with melting mozzarella is addicting. Want to see how I make the cheesy cousin to these breadsticks? Check out my recipe for Cheesy Garlic Rolls for a slightly different texture!
Here’s the simple trick to adding that glorious gooey factor. You do *not* add the cheese when you brush on the garlic butter. If you do that too early, the cheese melts right off or just gets greasy.
The Trick for Perfectly Melted Cheese
About two minutes before your breadsticks are done with their initial bake—say, when they are just starting to look golden but aren’t totally done yet—pull the sheet pan out of the oven. Now, this is when you sprinkle on your cheese of choice. I recommend a good low-moisture mozzarella if you are aiming for that classic pull, or a blend of cheddar and Monterey Jack for flavor.
Tuck those cheesed-up breadsticks right back into the oven for those final two minutes. You are just waiting for the cheese to get bubbly and soft. Make sure you are watching like a hawk! You don’t want the oven setting to burn those beautiful cheese edges.
Finishing Up with Garlic Butter and Parm
Once you pull the pan out *with* the melted cheese, that’s your cue to brush them immediately with the melted garlic butter mixture we already made. The hot butter melts into the cheese blanket perfectly. Then, finish it all off with that final dusting of Parmesan cheese. It sticks right to the melted mozzarella!
If you want some more inspiration on seriously cheesy appetizers, this link over to Cheesy Garlic Breadsticks gives you a great visual of what we are aiming for!
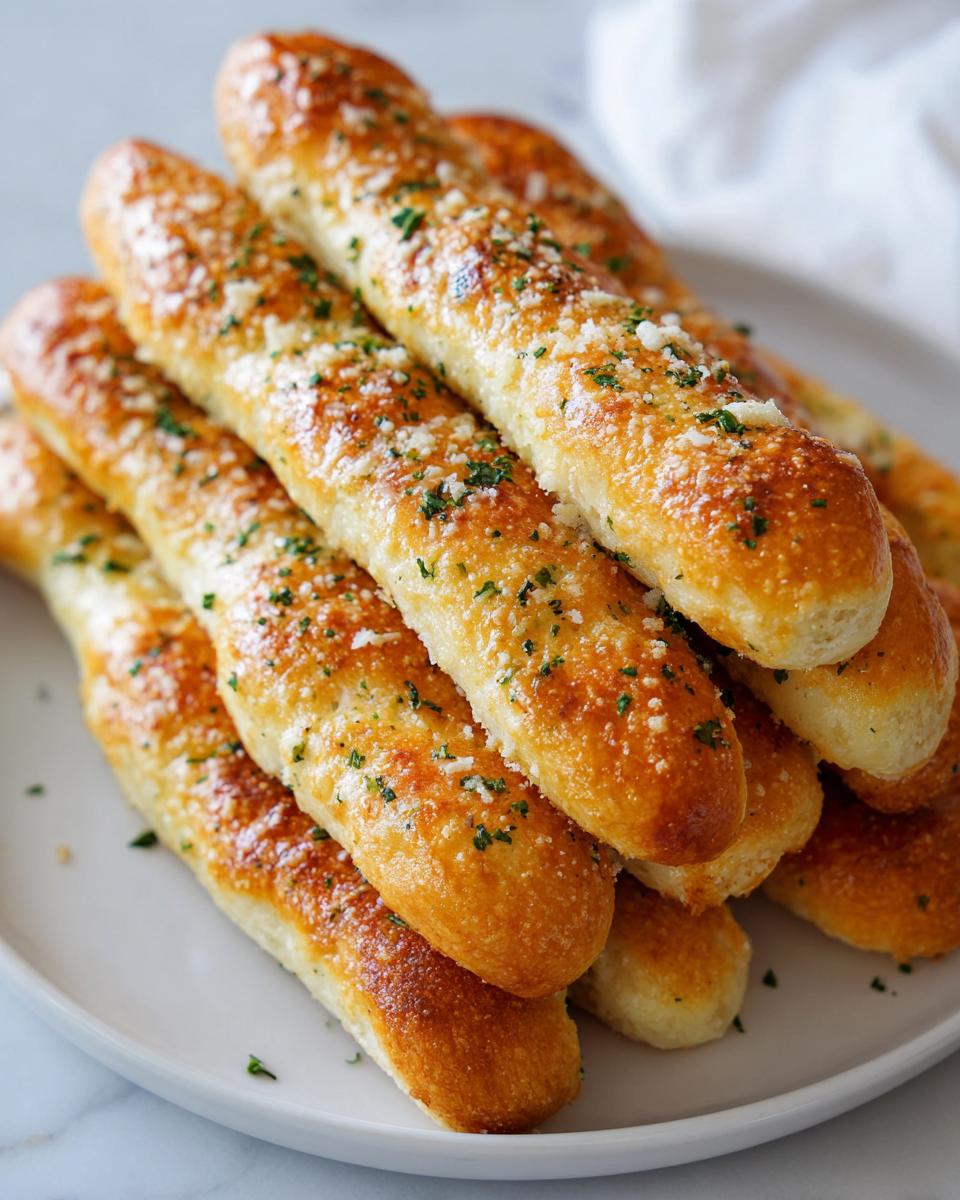
Seriously, these cheesy breadsticks are dangerous. They are perfect for dipping in marinara sauce if you happen to have leftover sauce from making something like chicken piccata or just need a snack!
Tips for Success with Your Breadsticks Dough Recipe
Even though this is an easy breadsticks recipe, yeast can sometimes be fussy! I’ve made enough batches of these homemade breadsticks to learn exactly where folks sometimes stumble. Getting that soft, chewy texture is all about nailing just a couple of small details when you are working with the dough.
Don’t stress if your first batch isn’t picture-perfect flaky, but pay attention to these points, and you’ll be making restaurant style breadsticks in no time. I always reference my notes when I’m tackling a dough that needs a good rise!
Don’t Skip Warming the Water
I can’t stress this enough about yeast: it needs lukewarm, not hot, water. If the water is too cold, the yeast just chills out and does nothing—you end up with dense results instead of fluffy breadsticks. If the water is too hot, you actually kill the yeast, and then you’re just making salty bread. Seriously, grab that quick thermometer if you can!
If you are having trouble getting a good rise time, check your kitchen temperature, too. Yeast loves warmth. If my kitchen is chilly, I usually stick the bowl of dough in the microwave (with the microwave OFF!) for 10 minutes halfway through its rise. It mimics that perfect warm environment.
Mastering the Knead for Soft Breadsticks
The kneading stage is vital for developing the gluten structure for maximum chewiness. Remember, we want elasticity without toughness. You should knead until the dough passes the ‘windowpane test’—where you can gently stretch a small piece thin enough to see light through it without it tearing immediately. This means your gluten network is developed nicely!
This dough shouldn’t feel tight or stiff; it should feel soft and pliable when you gently press it. If you over-knead, or if you add way too much flour during kneading, you’ll end up making Italian Breadsticks that are too dense or even a little tough, which is the opposite of what we want for the Olive Garden copycat vibe.
The Quick Bread Recipe Out: Using Store-Bought Dough
Hey, I totally get it. Sometimes you need that appetizer bread sticks fix, and starting homemade dough from scratch isn’t in the cards. If you are in a massive hurry, you are absolutely allowed to use refrigerated pizza dough. It skips steps 1 through 4 entirely!
If you use store-bought dough, you still need to let it sit out on the counter for at least 30 minutes so it warms up a bit—cold dough is hard to roll, and it won’t bake as evenly. Then, just skip to the shaping and baking steps. It won’t have that incredible depth of flavor from the yeast/sugar activation, but desperate times call for delicious, fast breadsticks, right? Perfect if you’re whipping up a quick sauce for dipping, like this creamy garlic sauce!
Making Sure That Garlic Butter Sinks In
This is my final piece of advice for signature flavor: Timing is everything with that Garlic Butter Topping. Those breadsticks have to hit the cooling rack directly from the oven. The residual heat melts that butter instantly and lets it soak deep into the crust instead of just sitting on top in a greasy puddle.
And don’t be shy with the brushing! Use a pastry brush and get every surface coated before you dust all over with that Parmesan cheese. That rich butter is what separates the good homemade breadsticks from the great ones.
Storage and Make Ahead Breadsticks Instructions
You know, the biggest problem with having the best homemade breadsticks on the planet is that they rarely last until the next day! But if you manage to save a few, or if you’re smart and planned ahead, here’s how I handle storing and reviving these buttery beauties.
My first step is always to let them cool completely. If you try to store them warm, the condensation builds up inside the container, and they get soggy fast. Nobody wants a soggy breadstick, especially not when we worked so hard on that soft texture!
Storing Leftovers for Later
Once they are totally cooled down—and I mean cooled, not even slightly warm—you need an airtight container or even a heavy-duty zip-top bag. Try to get them stacked as tightly as possible so less air is reaching them, which keeps them from drying out too much overnight. They are usually good at room temperature for about two days. After that, that buttery garlic flavor starts to fade, bless their hearts.
If you think it’ll be longer than two days, go ahead and toss them in the freezer. They freeze surprisingly well! Wrap them tightly in a layer of plastic wrap first, and then tuck them into a freezer bag. They honestly keep great for up to three months this way. It’s perfect for having appetizer bread sticks ready when unexpected guests drop by!
Reheating for That Fresh-Baked Taste
Okay, reheating is where you bring back the magic. Microwaving them will turn them immediately into sad, chewy little rubber bands. We won’t do that! The oven is your best friend here.
Preheat your oven to about 350°F—not too hot, we aren’t baking them again, just warming them up. Lay the breadsticks out in a single layer on a baking sheet. You only need about 5 to 8 minutes. This gentle heat warms the butter back up and firms up the crust just enough to bring back that soft, chewy chewiness we love.
If you are reheating frozen ones, just thaw them on the counter for maybe an hour first, or add about 5 more minutes to the baking time. And if you’re feeling extra, brush them with a tiny bit more melted butter (maybe skip the Parmesan this time) right before the last minute of heating!
Making Dough Ahead of Time
If you really want to be on top of your game, you can prepare the dough completely ahead of time. This is the ultimate secret to being ready when company shows up! Once I finish kneading my dough (Step 3), I put it in an oiled bowl, cover it, and place it right in the refrigerator instead of letting it rise on the counter.
You can keep that dough resting in the cold for up to 3 days! It actually develops a bit more flavor when it ferments slowly in the cold. When you are ready to bake, just pull it out, let it sit on the counter for about 45 minutes until it warms up enough to handle, and then proceed with shaping and the second rise as normal. You can find more detailed instructions on doing this in my dedicated post about make ahead breadsticks!
Serving Suggestions for Dinner Side Dish Bread
Okay, now that you’ve made an entire basket of the most glorious, garlicky, soft breadsticks known to man, the obvious question is: what do we eat them with? Honestly, you could just sit here and eat the whole batch dipped in ranch dressing, and I wouldn’t judge you. But these are truly the ultimate appetizer bread sticks or that perfect, buttery side dish that completes an Italian-American feast!
Because these are so reminiscent of restaurant favorites, they pair perfectly with anything saucy. Forget about relying on meal planning services for your sides when you have these ready to go! They are far superior to the sad little rolls you sometimes get delivered.
Pasta Perfection
This is the classic pairing everyone wants! These breadsticks practically beg to be dipped into sauce. Think rich, hearty dishes that need something to mop up every last drop. My favorite pairing has to be a big bowl of spaghetti and meatballs or perhaps my quick and comforting Italian Wedding Soup. If you’re making lasagna, forget serving boring garlic toast—these are the ticket!
Make sure you have a side bowl of warm marinara sauce handy for dipping, too. That combination of the rosemary and Italian seasoning in the breadsticks dipped in tangy tomato sauce is just unbeatable. If you need help with the main course, I have lots of ideas over on this Italian flavor reference!
The Salad Necessary Counterbalance
If you’re going heavy on the pasta, you need something fresh to cut through all that butter and Parmesan, right? These breadsticks are the perfect contrast to a big, crisp salad. Think Caesar salad—extra crunchy croutons are unnecessary when you have these babies on the table!
This is where the copycat feel really comes into play. Load up on crisp romaine, some sharp Parmesan shavings, and a bright, tangy Italian dressing. The salty, garlicky breadsticks just melt right into that fresh salad experience. It’s a flawless balance of textures!
As an Easy Appetizer or Game Day Snack
Don’t limit these! They don’t just belong next to dinner. If you’re watching a game or have friends over unexpectedly, these homemade breadsticks are the easiest showstopper appetizer. If you decide to turn them into Cheesy Breadsticks using mozzarella, they become even more irresistible for snacking.
I love setting out a basket of these warm breadsticks right next to a bowl of creamy spinach dip or even some simple, homemade hummus. Honestly, once you pull them out of the oven, they disappear faster than you can say “Parmesan cheese.”
Frequently Asked Questions About These Breadsticks
I know you’re going to love these, but sometimes little questions pop up when you’re moving from craving to baking mode. Here are the things everyone asks me when I get to this stage of sharing breadstick recipes. I tried to answer everything about texture, speed, and making sure that garlic flavor shines through, just like at your favorite spot!
Are these breadsticks truly soft and chewy like the restaurant version?
Oh, absolutely! That’s the whole point of this recipe, right? The softness and chewiness all come down to two things we focus on: dough hydration and baking time. We use just enough water to keep that dough incredibly pillowy, and then we bake them fast and hot at 400°F. This cooks them through quickly, setting the crust without drying out the inside. If your breadsticks come out too hard, try letting the dough rest a little longer during the shaping phase next time!
Can I make these Garlic Breadsticks faster than the listed time?
You sure can sneak a little speed trick in here if you need a true Quick Bread Recipe. The main time sink here is the first rise taking a full hour. If you’re really pressed for time, you can punch the dough down after maybe 40 minutes if it has clearly doubled. It might result in slightly less flavor complexity, but they’ll still be tasty!
The fastest way, though, is what I mentioned earlier: ditch the homemade dough entirely and opt for a good quality refrigerated store-bought pizza dough. You skip the yeast activation, the mixing, and the primary rise, turning this into an appetizer that’s ready in about 25 minutes total. Sometimes, convenience wins, and I won’t judge you for it!
What is the best way to reheat leftover breadsticks?
Please, for the love of garlic butter, avoid the microwave if you can! Microwaves transform any delicious bread into a sad, tough piece of chewable cardboard. The absolute best way to bring these soft breadsticks back to life is in the oven. Preheat your oven—or even a toaster oven—to 350°F. Lay the breadsticks out flat on a baking sheet and warm them for 5 to 8 minutes.
If you want to really treat yourself, brush them with a tiny bit of extra melted butter right before they go in, or sprinkle them with a tiny pinch of salt halfway through reheating. This brings back that fresh-baked softness and crispy exterior beautifully. If you want to dive deeper into how I manage my kitchen prep time, you can check out my general thoughts on my kitchen blog here!
Estimated Nutritional Values for These Breadsticks
Now, just so you know where we stand nutritionally—and this is important stuff to keep in mind when you’re tearing through a whole basket yourself! Keep in mind these are just estimates based on the recipe using standard pantry items. If you switch to mozzarella, your numbers will change a bit, naturally.
These figures are based on one breadstick serving size:
- Serving Size: 1 breadstick
- Calories: 210
- Fat: 9g (5g saturated)
- Sodium: 350mg
- Carbohydrates: 30g
- Protein: 6g
- Sugar: 2g
We get a good bit of fat from that rich garlic butter topping, but we keep the sugar pretty low since we only use it to feed the yeast, not to sweeten the bread itself. Enjoy them guilt-free!
Serving Suggestions for Dinner Side Dish Bread
Okay, now that you’ve made an entire basket of the most glorious, garlicky, soft breadsticks known to man, the obvious question is: what do we eat them with? Honestly, you could just sit here and eat the whole batch dipped in ranch dressing, and I wouldn’t judge you. But these are truly the ultimate appetizer bread sticks or that perfect, buttery side dish that completes an Italian-American feast!
Because these are so reminiscent of restaurant favorites, they pair perfectly with anything saucy. Forget about relying on meal planning services for your sides when you have these ready to go! They are far superior to the sad little rolls you sometimes get delivered.
Pasta Perfection
This is the classic pairing everyone wants! These breadsticks practically beg to be dipped into sauce. Think rich, hearty dishes that need something to mop up every last drop. My favorite pairing has to be a big bowl of spaghetti and meatballs or perhaps my quick and comforting Italian Wedding Soup. If you’re making lasagna, forget serving boring garlic toast—these are the ticket!
Make sure you have a side bowl of warm marinara sauce handy for dipping, too. That combination of the rosemary and Italian seasoning in the breadsticks dipped in tangy tomato sauce is just unbeatable. If you need help with the main course, I have lots of ideas over on this Italian flavor reference!
The Salad Necessary Counterbalance
If you’re going heavy on the pasta, you need something fresh to cut through all that butter and Parmesan, right? These breadsticks are the perfect contrast to a big, crisp salad. Think Caesar salad—extra crunchy croutons are unnecessary when you have these babies on the table!
This is where the copycat feel really comes into play. Load up on crisp romaine, some sharp Parmesan shavings, and a bright, tangy Italian dressing. The salty, garlicky breadsticks just melt right into that fresh salad experience. It’s a flawless balance of textures!
As an Easy Appetizer or Game Day Snack
Don’t limit these! They don’t just belong next to dinner. If you’re watching a game or have friends over unexpectedly, these homemade breadsticks are the easiest showstopper appetizer. If you decide to turn them into Cheesy Breadsticks using mozzarella, they become even more irresistible for snacking.
I love setting out a basket of these warm breadsticks right next to a bowl of creamy spinach dip or even some simple, homemade hummus. Honestly, once you pull them out of the oven, they disappear faster than you can say “Parmesan cheese.”
Share Your Homemade Breadsticks Experience
I poured my whole heart into getting this Olive Garden copycat just right, and I really hope this recipe brings the same joy to your table that it does to mine. Seeing your successes is honestly the best part of running this blog!
When you try these Ultimate Soft & Chewy Homemade Breadsticks, please let me know how they turned out! Leave a rating using the stars below so other bakers know how reliable this recipe is. And don’t forget to snap a picture! Tag me on Instagram or send me a message through the contact page—I love seeing those baskets full of perfectly buttery, chewy breadsticks!
Estimated Nutritional Values for These Breadsticks
Now, just so you know where we stand nutritionally—and this is important stuff to keep in mind when you’re tearing through a whole basket yourself! Keep in mind these are just estimates based on the recipe using standard pantry items. If you switch to mozzarella, your numbers will change a bit, naturally.
These figures are based on one breadstick serving size:
- Serving Size: 1 breadstick
- Calories: 210
- Fat: 9g (5g saturated)
- Sodium: 350mg
- Carbohydrates: 30g
- Protein: 6g
- Sugar: 2g
We get a good bit of fat from that rich garlic butter topping, but we keep the sugar pretty low since we only use it to feed the yeast, not to sweeten the bread itself. Enjoy them guilt-free!
Share Your Homemade Breadsticks Experience
I poured my whole heart into getting this Olive Garden copycat just right, and I really hope this recipe brings the same joy to your table that it does to mine. Seeing your successes is honestly the best part of running this blog! It proves that anyone can master these soft breadsticks at home.
When you try these Ultimate Soft & Chewy Homemade Breadsticks, please let me know how they turned out! Leave a rating using the stars below so other bakers know how reliable this recipe is. And don’t forget to snap a picture! Tag me on Instagram or send me a message through the contact page—I love seeing those baskets full of perfectly buttery, chewy breadsticks!
Happy baking, friends!
PrintThe Ultimate Soft & Chewy Olive Garden Copycat Breadsticks with Garlic Parmesan Butter
Make soft, chewy breadsticks at home that taste just like the restaurant favorite. This easy recipe uses simple steps to create fluffy breadsticks topped with a rich garlic parmesan butter.
- Prep Time: 20 min
- Cook Time: 12 min
- Total Time: 1 hour 32 min
- Yield: 12 breadsticks 1x
- Category: Appetizer
- Method: Baking
- Cuisine: American
- Diet: Vegetarian
Ingredients
- 1 1/2 cups warm water (105-115°F)
- 2 1/4 teaspoons active dry yeast
- 2 tablespoons granulated sugar
- 4 cups all-purpose flour, plus more for dusting
- 1 teaspoon salt
- 1/4 cup vegetable oil, plus more for greasing
- 1/2 cup (1 stick) unsalted butter, melted (for topping)
- 4 cloves garlic, minced (for topping)
- 1 teaspoon dried Italian seasoning (for topping)
- 1/2 cup grated Parmesan cheese (for topping)
Instructions
- Activate the yeast: In a large bowl, combine the warm water, yeast, and sugar. Let this mixture sit for 5 to 10 minutes until it becomes foamy.
- Prepare the dough: Add 3 1/2 cups of the flour, salt, and 1/4 cup of vegetable oil to the yeast mixture. Mix until a shaggy dough forms.
- Knead the dough: Turn the dough out onto a lightly floured surface. Knead for 5 to 7 minutes, adding the remaining flour as needed until the dough is smooth and elastic. It should be soft.
- First rise: Lightly grease a large bowl with oil. Place the dough in the bowl, turning to coat. Cover the bowl with plastic wrap or a clean towel and let it rise in a warm place for 1 hour, or until doubled in size.
- Preheat and shape: Preheat your oven to 400°F (200°C). Line a large baking sheet with parchment paper. Punch down the risen dough and divide it into 12 equal pieces. Roll each piece into a long, thin stick, about 10 to 12 inches long. Place the breadsticks on the prepared baking sheet.
- Second rise: Cover the shaped breadsticks loosely and let them rest for 15 minutes while the oven finishes preheating.
- Bake: Bake for 10 to 12 minutes, or until the breadsticks are lightly golden brown.
- Make the garlic butter topping: While the breadsticks bake, combine the melted butter, minced garlic, and Italian seasoning in a small bowl.
- Brush and finish: Immediately after removing the breadsticks from the oven, brush them generously with the garlic butter mixture. Sprinkle evenly with the grated Parmesan cheese.
- Serve: Serve the breadsticks warm. For easy meal planning, you can prepare the dough ahead of time and bake when ready.
Notes
- For extra cheesy breadsticks, sprinkle mozzarella cheese over the tops during the last two minutes of baking before applying the garlic butter.
- If you prefer a quicker method, you can use store-bought pizza dough, skipping steps 1 through 4.
- These breadsticks pair well with pasta dishes or as a side when you are not using meal delivery companies.
Nutrition
- Serving Size: 1 breadstick
- Calories: 210
- Sugar: 2
- Sodium: 350
- Fat: 9
- Saturated Fat: 5
- Unsaturated Fat: 4
- Trans Fat: 0
- Carbohydrates: 30
- Fiber: 1
- Protein: 6
- Cholesterol: 15