


Oh my goodness, is there anything better than walking into your own kitchen and being instantly enveloped by the smell of proper, hot, fresh-baked bread? Seriously, that aroma is instant comfort! Forget those sad, squishy loaves from the supermarket shelf. Today, we’re going big time. We are tackling crusty Italian bread—the kind that cracks when you sink your teeth into it, but the inside is so soft and chewy it practically melts. That’s my absolute goal for you!
I’m Sarah, and here at Cut Cook Taste, we believe good cooking isn’t about fancy equipment; it’s about simple, reliable recipes that bring people together. If a recipe is fussy or requires equipment nobody has, it doesn’t make the cut. This Homemade Italian Bread Recipe is pure proof of that idea. This method, which I perfected after many sticky messes (don’t worry, I took notes!), gives you that perfect bakery-quality loaf at home without any fuss. Keep reading my story to learn more about my philosophy on simple cooking.
We are focusing on two things: a deeply golden, shatteringly crisp exterior and an interior crumb that has the perfect pull and chew. Trust me, this is the loaf you want for dipping in olive oil after a big dinner. The secret to the crunch is all in the final few minutes of baking, and I wouldn’t leave you hanging with a soft crust!

- Why This Homemade Italian Bread Recipe Delivers a Bakery Style Loaf at Home
- Simple Ingredients for Your Crusty Italian Bread
- Step-by-Step Instructions for Quick Italian Bread Baking
- Tips for Success When Making Rustic Italian Loaf Tutorial
- How to Serve Your Warm Fresh Baked Italian Bread
- Storage and Reheating Instructions for Homemade Italian Bread Recipe
- Frequently Asked Questions About Making Italian Bread
- Estimated Nutritional Data for This Italian Bread
- Share Your Golden Brown Homemade Bread Experience
- Estimated Nutritional Data for This Italian Bread
- Share Your Golden Brown Homemade Bread Experience
Why This Homemade Italian Bread Recipe Delivers a Bakery Style Loaf at Home
Honestly, my goal with this Homemade Italian Bread Recipe was to stop buying bread! I wanted that truly satisfying *thwack* when you tap the bottom of the loaf. Most simple recipes give you soft bread, which is fine, but it’s not the rustic experience I crave for dipping in sauce. This recipe guarantees you get that beautiful Bakery Style Loaf at Home, and it starts with one crucial trick I learned from watching old baking shows.
We aren’t looking for just ‘good’ bread; we are looking for the best bread, and that means mastering the environment it bakes in. I’ve tested this process dozens of times to make sure the timing is right so you don’t end up with a sticky mess. If you follow the steps, you’ll see the dramatic difference simple technique makes. Check out my deep dive on Italian bread secrets for more texture tips!
Achieving the Soft Inside Crispy Crust Bread Texture
It’s kind of like a little magic trick, but it’s pure science! The secret to that signature Soft Inside Crispy Crust Bread texture is steam. When dough hits a very hot oven, if the air is too dry, the crust sets too fast and ends up tough. By putting a pan of hot water on the bottom rack, we create steam right away. This keeps the surface of the dough moist for the first ten minutes, allowing it to expand fully, which gives you that lovely, airy rise inside.
Meanwhile, we developed the chewiness we love by giving the dough a good, solid 10-minute knead. That stretching activates the gluten, so when you slice into the finished loaf, it pulls apart beautifully instead of crumbling away. It’s that balance—steam for the crackle, kneading for the chew—that makes this bread a winner.

Simple Ingredients for Your Crusty Italian Bread
You know I promised you easy, right? Well, this recipe absolutely delivers. When I see people overwhelmed by bread recipes that call for weird flours or expensive starters, I just shake my head. For this rustic loaf, you only need basic pantry staples. Seriously, you probably have most of this stuff already! We’re talking about flour, salt, sugar, yeast, oil, and water. That’s it! You can use these simple things to make an amazing side bread.
The recipe makes exactly one generous loaf, which is perfect for a family dinner or for making epic sandwiches the next day. I made sure to list the most important things for you here:
- 3 1/2 cups all-purpose flour
- 1 1/2 teaspoons salt
- 1 teaspoon granulated sugar
- 2 1/4 teaspoons active dry yeast (That’s just one standard packet, folks!)
- 1 1/4 cups warm water (It absolutely needs to be between 105-115°F—not too hot, or you’ll kill the yeast!)
- 2 tablespoons olive oil, plus more for the bowl
Ingredient Notes and Substitutions for Authentic Italian Bread
Since this is a beginner-friendly recipe, don’t worry if you don’t have fancy bread flour. All-purpose flour works beautifully here! The kneading we do later develops the structure, so the flour type isn’t as critical as it is in, say, a sourdough. The only thing I beg you not to mess with is that water temperature for the yeast. If the water is much cooler than 105°F, the yeast sleeps in. If it’s hotter than 115°F, bye-bye yeast! That initial foaminess is your green light that your bread will be chewy.
Step-by-Step Instructions for Quick Italian Bread Baking
Now for the fun part! This recipe is designed for speed and reliability, giving you that great crust in a surprisingly short time. We are covering the whole process for Quick Italian Bread Baking, from that bubbly yeast action to the final glorious moment it comes out of the oven. Don’t panic about the rising times—they are estimates, and your kitchen temperature plays a huge role. Just watch the dough, not the clock, okay?
We’ll move through activation, kneading for that chew, shaping, the final proof, and finally, that steam trick that makes all the difference for that crackly outside shell. Remember, since you’re building flavor, this bread is fantastic served warm as your dinner side bread!
Activating Yeast and Mixing the Italian Bread Dough
First things first: wake up your yeast! In a big bowl, gently whisk together your warm water, sugar, and yeast. Give it about five minutes. If you see a nice, happy foam on top—like a creamy head on a root beer—you are golden! If it does nothing, your water was either too hot or too cold, and you need to start that step over with fresh yeast. Once it’s foamy, just dump in the flour, salt, and that two tablespoons of olive oil. Mix it with a sturdy wooden spoon until it looks like a hot mess—what bakers call a “shaggy dough.” Don’t try to save your spoon; this is where we switch to our hands!
Kneading for the Best Chewy Interior on Your Italian Bread
Time for some elbow grease! Turn that crumbly dough out onto a lightly floured surface. Even though we want this to be easy, this 8 to 10 minutes of kneading is non-negotiable if you want that perfect chew. You need to work the dough until it feels smooth, soft, and elastic—not sticky, but pliable under your hands. This process is what develops all those gluten strands, making it possible to achieve that wonderfully chewy texture we crave in How to Make Chewy Italian Bread. Don’t stop early, or the loaf will be cakey rather than satisfyingly springy!
The Steam Secret for a Crusty Exterior on Your Italian Bread
Okay, pay close attention because this is the secret weapon that makes this an authentic Italian loaf! This happens right when the dough is having its second, shorter rise (about 30–45 minutes). Preheat your oven to 400°F, but make sure you put an empty, shallow pan (like an old metal cake pan) on the bottom rack while it heats up. When the oven is screaming hot and you pop your shaped loaf in, quickly toss a handful of ice cubes right into that hot pan below. Whoosh—instant steam! This steam traps moisture around the doughs surface, allowing the crust to stay soft just long enough to puff up dramatically, giving you an amazing, crackly exterior like you get from a professional bakery!
Tips for Success When Making Rustic Italian Loaf Tutorial
Even following the steps perfectly, bread baking always has a little room for fine-tuning, right? That’s where those little bits of experience come in handy. When I practice this Rustic Italian Loaf Tutorial, I swear by a few things to guarantee that bakery-quality result. Don’t skip these little details; they’re what separates a decent loaf from a spectacular one!
First off, talk about temperature! Make sure your kitchen isn’t freezing when those rises are happening. Dough loves warmth. If your kitchen is chilly, put the covered dough in the oven *with the oven light on* (but remember, the oven is OFF!). Seriously, that gentle heat speeds up the life in the yeast and gives you great volume.
Second, I really wish I had learned this sooner: water temperature is everything when activating the yeast. If you use a meat thermometer, aim for that sweet spot of 110°F. Too cold, and you wait forever; too hot, and you’ve made bread soup. This precision is key, even for a beginner’s loaf like this, and it’s something I learned early on trying to make sweet breads!
My biggest, non-negotiable tip, though, is about cooling. You have to let this Italian bread cool completely on a wire rack before slicing. I know, I know—the smell is intoxicating, and you want to tear into that warm, soft interior right away. But trust me! If you slice it hot, all that steam trapped inside escapes too fast, and you’ll mash down the inside crumb, making it gummy, and you’ll lose that crackle on the crust. Give it at least an hour, maybe check out a wonderful crusty bread recipe while you wait! Patience on cooling guarantees a chewy result rather than a dense one.
Lastly, if you can, use a baking stone or even a heavy cast iron skillet in the oven while it preheats. When you transfer your loaf (on parchment paper) onto that hot surface, the immediate blast of heat from below seals the bottom crust beautifully, giving you an all-around golden brown finish that just looks professional.

How to Serve Your Warm Fresh Baked Italian Bread
Now we get to the best part—eating this beauty! Honestly, the hardest part is over; the bread is cooled, and that beautiful shatter of crust is waiting for you. This loaf is truly versatile, making it one of the best Dinner Side Bread Ideas you can keep in your back pocket. It’s a shame to let such high-quality texture go to waste!
Of course, the absolute classic move is serving it fresh! Nothing beats that moment when you slice into the Warm Fresh Baked Bread and you hear that satisfying crackle. We usually just slice it thick and leave a bowl of good quality olive oil right there on the table for dipping. If you’ve got any leftover sauce from last night’s pasta, this bread is the perfect tool for scraping the bowl clean. It’s the ultimate comfort food experience!
Beyond dipping, these substantial slices are just begging to be turned into epic sandwiches. Forget flimsy sandwich bread; this loaf stands up to anything you throw at it. I often use it when I make something really hearty and layered, like the Italian-inspired sandwiches I love to whip up. You can totally build a powerhouse lunch using these slices—check out my Muffuletta recipe for some inspiration on loading up good bread!
It even holds up perfectly when you want something hot and rich, like pairing it with steak bites dipped in that amazing garlic butter I preach about. You know, the famous Cowboy Butter? That salty, herby dip is honestly addictive with this crusty exterior!
The Best Italian Bread for Dipping
If you are specifically looking for the absolute greatest dipping experience, you need to pair this crusty loaf with something intensely flavorful. Obviously, good olive oil is mandatory, maybe with a little cracked black pepper mixed in. But when you’re having Italian food? You absolutely have to have a side of warm marinara sauce for dipping. It soaks up just enough of the rich tomato flavor without getting soggy immediately, thanks to that sturdy crumb we worked so hard to build.
Another winner is a simple garlic butter dip. Just melt a stick of butter with a couple of cloves of fresh, minced garlic and some dried oregano. That savory, garlicky warmth mixed with the crunchy texture of the bread is honestly perfection. Whether it’s paired with rich sauces or something simple like herbs and oil, this bread is your best friend for soaking up every last bit of flavor on your plate.
Storage and Reheating Instructions for Homemade Italian Bread Recipe
Okay, you’ve made the perfect loaf, and it smells incredible, but now the reality sets in: how do I keep this beauty crusty for more than five minutes? Because let’s be real, this bread is so good you won’t finish it in one sitting (unless you try!). Stuffing it into a plastic bag is the absolute enemy of the crunchy exterior we worked so hard for.
If you plan to eat the rest tomorrow, you need to be strategic. The moment the bread is completely cool—and I mean *completely* cool, remember cooling sets the structure—you should wrap it loosely in a clean kitchen towel or even some slightly waxy parchment paper. Then, place that wrapped bundle into a paper bag. The paper absorbs just enough ambient moisture to prevent the crust from softening too rapidly, but it still allows the loaf to breathe. This is infinitely better than relying on something like meal planning services where the bread arrives already sad and squishy.
If you have more leftovers than you can eat within two days, do not leave it on the counter! That’s when it gets really stale. Slice it up, put those slices in a freezer-safe bag, and freeze them flat. They freeze beautifully! When you want a slice later, just pop it straight into the toaster oven or under the broiler for just a minute or two. It comes back to life amazingly well, regaining that satisfying crunch.
For reheating a whole loaf that has gone slightly stale, that steam trick from the baking instructions comes back into play! Brush the loaf lightly with water, wrap it tightly in foil, and bake it at 350°F (175°C) for about 10 to 15 minutes. That steam trapped by the foil rehydrates the crumb, and then when you unwrap it for the last five minutes, the crust crisps right back up. It’s almost like baking it all over again! Don’t forget to check out some great crusty bread tips if you need a little extra help keeping that exterior perfect!
Frequently Asked Questions About Making Italian Bread
I’ve spent so many hours in the kitchen testing this dough, and I know you probably have questions swirling around, especially if you are newer to baking. Bread can seem intimidating, but I promise this recipe is truly designed for Beginner Bread Recipes! Getting that perfect texture is all about knowing what you can tweak and what you absolutely cannot touch. Let’s knock out a few of those burning questions I always get!
Can I skip the kneading step in this Italian Bread Recipe?
This is the trickiest question, and I have to be honest with you: No, you really can’t skip kneading here if you want that authentic, chewy Italian bread texture. We knead for a good 8 to 10 minutes because that physical work develops the gluten strands that make the interior elastic and slightly chewy. If you skip it and just mix it gently, you’ll end up with something much closer to focaccia or a very light, soft white bread—it won’t have that satisfying structure.
If you are looking for true Easy No Knead Italian Bread, that’s a totally different technique that relies on very long, slow rising times to develop flavor and structure instead of physical kneading. For this specific recipe, however, kneading gives you that perfect combination of speed and texture. Don’t be scared of it; just put on some good music and let the dough work for you!
How can I make the crust even darker and more golden brown?
Achieving that deep, beautiful mahogany color is all about sugar and temperature, which is exactly why we use brown sugar in our main dough! If you want to push it darker than the recipe suggests, you have two great options, but you have to watch carefully, especially near the end of the bake.
The easiest way to get gloss and color is to give the loaf a quick brush right after it comes out of the steam bath and just before it goes into the oven. You can brush it lightly with a mixture of one egg whisked with one tablespoon of water—this is called an egg wash! It makes the crust shiny and encourages a deeper, richer golden brown. If you absolutely don’t want to use an egg, just brush it with a little plain water right before it goes in, and then bump your oven temperature up 10 degrees for the last five minutes of the bake. Just watch it like a hawk so it doesn’t burn on the edges while you are trying to get that perfect color!

I like spending time browsing baking forums like the one hosted on my blog’s main page when I have questions like these. It helps to see what other home cooks are trying!
Estimated Nutritional Data for This Italian Bread
I always try to keep things straightforward in the kitchen, and that goes for nutrition, too! Keep in mind that baking is an art, and since we are dealing with homemade flour absorption and size variations, this is just an estimate. This gives you a good general idea of what you’re eating when you cut a nice thick slice from your loaf.
For one standard slice of this Italian bread, here is the breakdown:
- Serving Size: 1 slice
- Calories: 150
- Sugar: 1g
- Sodium: 250mg
- Fat: 3g
- Saturated Fat: 0.5g
- Unsaturated Fat: 2.5g
- Trans Fat: 0g
- Carbohydrates: 28g
- Fiber: 1.5g
- Protein: 4g
- Cholesterol: 0mg
Because we use simple ingredients and rely on yeast and time instead of a lot of added fats, it keeps things surprisingly reasonable compared to store-bought loaves that often have loads of preservatives!
Share Your Golden Brown Homemade Bread Experience
Seriously, I want to see your beautiful loaves! Making this crusty bread is such a rewarding experience, and nothing makes me happier than hearing from someone who just pulled a perfect, Golden Brown Homemade Bread creation out of their own oven. Did the crust crackle? Did your family immediately devour half the loaf?
Please, please leave a comment below! Tell me how long it took for your dough to rise, what you served it with, and most importantly, how that crust held up after cooling. Your feedback helps me refine these recipes even more, and it helps other cooks gain confidence to try this recipe. If you have pictures you want to share, you can always reach out to me through my contact page. Happy baking, everyone!
PrintCrusty Italian Bread: Simple Steps for a Golden Crust and Soft Interior
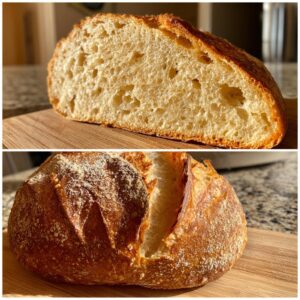
Bake bakery-quality Italian bread at home with this easy recipe. You achieve a golden, crackly crust and a soft, chewy center using simple ingredients.
- Prep Time: 20 min
- Cook Time: 35 min
- Total Time: 2 hours 35 min
- Yield: 1 large loaf 1x
- Category: Bread
- Method: Baking
- Cuisine: Italian
- Diet: Vegetarian
Ingredients
- 3 1/2 cups all-purpose flour
- 1 1/2 teaspoons salt
- 1 teaspoon granulated sugar
- 2 1/4 teaspoons active dry yeast (1 packet)
- 1 1/4 cups warm water (about 105-115°F)
- 2 tablespoons olive oil, plus more for the bowl
Instructions
- In a large bowl, mix the warm water, sugar, and yeast. Let stand for 5 minutes until foamy.
- Add the flour, salt, and 2 tablespoons of olive oil to the yeast mixture. Mix with a wooden spoon until a shaggy dough forms.
- Turn the dough out onto a lightly floured surface. Knead for 8 to 10 minutes until the dough is smooth and elastic. This develops the chewiness you want.
- Lightly oil a clean bowl. Place the dough in the bowl and turn it to coat. Cover the bowl with plastic wrap or a clean kitchen towel. Let the dough rise in a warm place for 1 to 1.5 hours, or until doubled in size.
- Gently punch down the dough. Shape it into a loaf or two smaller loaves. Place the shaped dough on a baking sheet lined with parchment paper or in a prepared loaf pan.
- Cover the dough loosely and let it rise again for 30 to 45 minutes, or until puffy. While it rises, preheat your oven to 400°F (200°C). Place a shallow pan on the bottom rack to create steam later.
- Just before baking, brush the top of the loaf lightly with water. For a crispier crust, place a few ice cubes in the hot shallow pan on the bottom rack to create steam.
- Bake for 30 to 35 minutes, or until the crust is deep golden brown and the internal temperature reaches 200°F (93°C).
- Remove the bread from the oven and cool completely on a wire rack before slicing. This step helps set the crust.
Notes
- For the best crust, use a baking stone if you have one, preheated with the oven.
- If you are planning your weekly meals, this bread is a great side dish that pairs well with many main courses, similar to what you might find with meal planning services.
- To keep the bread warm, wrap it loosely in a clean towel after cooling slightly.
Nutrition
- Serving Size: 1 slice
- Calories: 150
- Sugar: 1
- Sodium: 250
- Fat: 3
- Saturated Fat: 0.5
- Unsaturated Fat: 2.5
- Trans Fat: 0
- Carbohydrates: 28
- Fiber: 1.5
- Protein: 4
- Cholesterol: 0